Presenting here full process about how to install WordPress on Hostgator after purchasing a new hosting plan. Here i will share my own way to launch WordPress through Cpanel so let’ get started

WordPress is best platform for blogging but for creating a blog on wordpress you must need a hosting server, without this you can’t make wordpress self hosted blog
When it’s comes for best wordpress hosting, hostgator is a best for newcomer every pro blogger said choosing hostgator is a best for wordpress users. Well i will not say anything about this because in this article i will talk about how to install wordpress on hostgator hosting server
How to Install WordPress on Hostgator by Using CPanel
To install wordpress on hostgator hosting server you need to bought a hosting plan, if you have already purchased then check your registered mail id, they’ll give you cpanel logins so open the link and login your cpanel by using username and password

Now follow above simple steps to install wordpress on hostgator:
- Login your Cpanel
- Search wordpress on the software section and click on it
- Click on ‘Install’ option
- Now, on the next page you have to have to fill a form
- Finally click on ‘Install WordPress’and done!
Congratulation you have successfully installed wordpress on hostgator by using cpanel
Now let’s see what you have to enter details before you install the site, checkout this screenshot and do what i said here
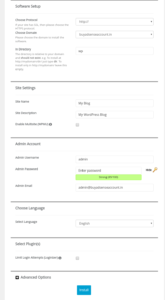
WordPress Software Setpup
- Use http if you have SSL then select https
- Select your domain in which you want to install wordpress
- Remove ‘wp’ from there
Site Settings
- Enter your site name (you can change it later if you want)
- Enter description of your site (you can change it too)
- Then leave last option
Admin Account
- Update username
- Update password or choose have already there
- Enter your mail id
That’s all, now you don’t need to do anything just scroll down and click on install button, that’s it! It will be install within 1-5 minutes
Sometimes it takes time due to slow server or your net connection problem, however i have never faced any such issue.
Checkout this video to install wordpress on hostgator using cpanel-
If you getting any error or any problem during installing wordpress then you can hire us, we’ll install it for you at very suitable price. Contact us on Facebook or whatsapp +91 8116027065
How to Point Your Domain Name to Hostgator after Installing WordPress
After installing wordpress on hostgator you need to point your domain name to hostgator or if your domain has registered with hostgator then don’t need to do anything, if registered with godaddy or bigrock then follow above steps
You need to change your nameserver from Godaddy, hostgator has sent you two nameserver you have to update them on your domain
To change name server follow above process
- Login your godaddy or bigrock account
- Select domain which you want to update nameserver
- Click on nameserver option and add both nameserver correctly
- Finally click on save option and done
Well done, now your site is live. Please note changing nameserver will take upto 24 hour so after changing if your site will not open correctly then you should wait upto 24 hour
So hope you enjoyed this article and its helped you to understand how to install wordpress on hostgator, if you have any problem then feel free to contact us or drop your comment if you have any question related this post!